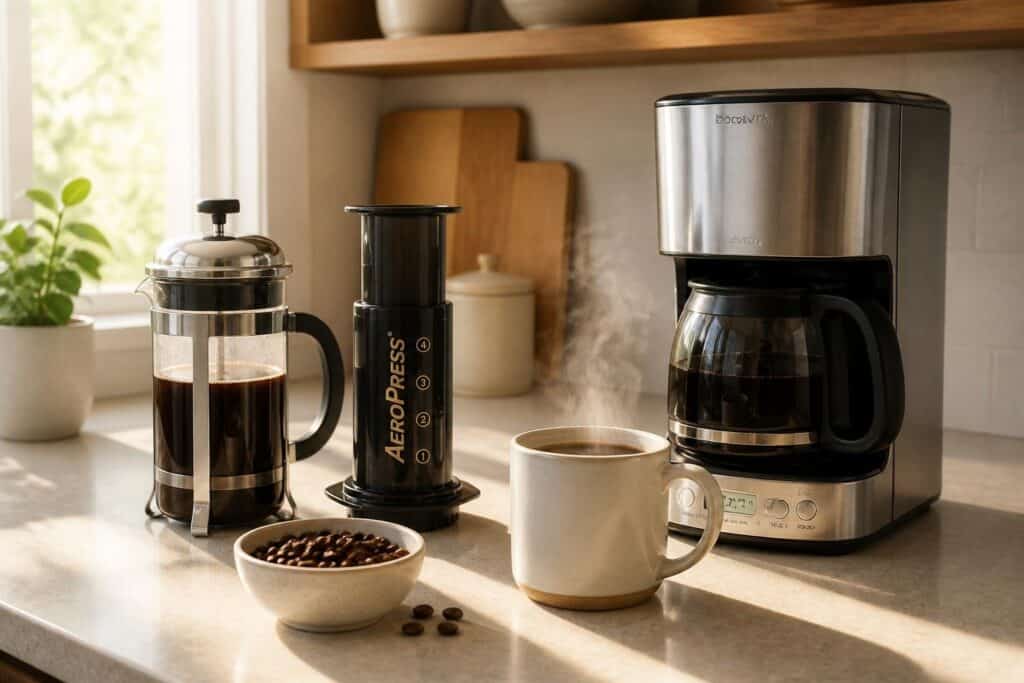
Brewing great coffee at home doesn’t require barista-level skills or expensive equipment. The best brewing methods for beginners are the French press, AeroPress, and drip coffee maker because they’re forgiving, affordable, and produce consistently good results with minimal technique. Once you understand a few basic principles about coffee, water, and timing, you can start making drinks that rival your favorite café.
The key to success lies in understanding what makes each method work and matching it to your preferences. Some methods produce bold, full-bodied coffee while others create clean, bright cups. You’ll learn about the fundamentals that apply to all brewing, how to select quality beans and grind them properly, and which variables matter most when you’re starting out.
This guide walks you through beginner-friendly techniques with straightforward instructions, covers manual brewing devices that give you more control as you develop your skills, and provides practical tips for improving your results. Whether you have five minutes or fifteen, there’s a method here that fits your lifestyle and delivers the flavor you’re looking for.
Fundamentals of Brewing Coffee at Home
Successful home brewing requires three core elements: understanding different methods and how they extract flavor, having the right equipment to control your brew, and starting with quality fresh beans that preserve essential oils and flavors.
Understanding Coffee Brewing Methods
Coffee brewing methods fall into two main categories: immersion and percolation. Immersion methods like the French press steep ground coffee directly in water for several minutes. Percolation methods like pour-over force water through coffee grounds using gravity or pressure.
Each manual brewing method extracts different flavor compounds from your beans. The French press produces full-bodied coffee because metal mesh filters allow oils and fine particles through. Pour-over techniques like Chemex create cleaner cups since paper filters trap these elements.
Your choice of coffee brewer affects extraction time, water temperature control, and final taste. A Moka pot brews strong espresso-like coffee in 5 minutes. An AeroPress offers versatility and completes brewing in 1-2 minutes.
Understanding these basics helps you select methods that match your taste preferences and schedule. Dark roasts work well with immersion brewing. Light roasts shine with pour-over methods that highlight subtle flavors.
Key Equipment for Beginners
A coffee grinder is your most important investment for brewing coffee at home. Burr grinders crush beans between two surfaces, producing uniform particle sizes. Blade grinders chop beans unevenly, leading to inconsistent extraction.
Manual burr grinders cost less and deliver excellent grind quality but require physical effort. Electric burr grinders save time and maintain consistency. Even an affordable blade grinder beats pre-ground coffee if you understand its limitations.
A kitchen scale or dedicated coffee scale ensures accurate measurements. Most brewing methods use a 1:15 to 1:17 ratio—1 gram of coffee per 15-17 grams of water. Digital scales with 0.1-gram precision help you replicate successful brews.
You’ll need a kettle for heating water and a timer to track brew duration. Pour-over methods benefit from gooseneck kettles that control water flow. Standard kettles work fine if you pour carefully and slowly.
The Importance of Fresh Coffee Beans
Fresh coffee beans contain volatile oils and aromatic compounds that degrade quickly after roasting. Buying whole beans instead of ground coffee preserves these flavors until you’re ready to brew.
Coffee reaches peak flavor 3-14 days after roasting and starts losing complexity after 2-3 weeks. Look for roast dates on packaging and buy quantities you’ll consume within a month. Store beans in an airtight container away from light and heat.
Light roasted coffee beans highlight origin characteristics and work best with pour-over brewing. Medium roasts offer versatility across different coffee brewing methods. Dark roasted beans suit French press and espresso preparation where bold, robust flavors dominate.
Pre-ground coffee loses freshness within hours as surface area exposure accelerates oxidation. Grinding beans immediately before brewing maximizes flavor extraction and aroma in your cup.
Choosing the Right Coffee and Grind Size
The coffee you select and how you grind it directly impact your brew’s flavor, strength, and overall quality. Understanding bean varieties, roast levels, and grind sizes helps you make informed choices that match your brewing method and taste preferences.
Selecting Coffee Beans and Roast Levels
Arabica beans are the most popular choice for home brewing, offering smooth, nuanced flavors with moderate acidity. They account for about 60-70% of global coffee production and work well across all brewing methods.
Single-origin coffee comes from one geographic region and showcases distinct flavor characteristics. These coffees let you experience specific terroir notes, from fruity Ethiopian beans to chocolatey Colombian varieties. Coffee blends combine beans from multiple origins to create balanced, consistent flavor profiles that perform reliably regardless of brewing technique.
Light roast preserves the bean’s original characteristics with bright acidity and complex flavors. Medium roast provides balanced sweetness, body, and acidity—the most versatile option for beginners. Dark roast delivers bold, smoky flavors with lower acidity and more pronounced bitterness.
Medium roast coffee is your safest starting point. It forgives minor brewing mistakes while delivering satisfying results across different methods. Roast levels affect optimal grind size slightly, with darker roasts typically needing slightly coarser grinds than lighter roasts.
Determining Proper Grind Size

Coffee grind size controls how quickly water extracts flavor from your grounds. The basic principle is simple: finer grinds increase extraction speed, while coarser grinds slow it down.
Coarse grind resembles sea salt with large, distinct particles. Medium grind looks like regular sand with uniform texture. Fine grind feels similar to table salt or slightly coarser than powder.
Freshly ground coffee retains volatile aromatic compounds that dissipate within 15-30 minutes of grinding. This means grinding immediately before brewing produces noticeably better flavor than pre-ground coffee, which loses its aromatic complexity within days of processing.
Invest in a burr grinder if possible. Blade grinders create inconsistent particle sizes that lead to uneven extraction—some grounds over-extract while others under-extract in the same brew.
Matching Grind Size to Brewing Methods
| Brewing Method | Grind Size | Brew Time |
|---|---|---|
| French Press | Coarse | 4 minutes |
| Pour Over | Medium | 2-3 minutes |
| Drip Coffee Maker | Medium | 5-6 minutes |
| AeroPress | Fine | 1-2 minutes |
| Espresso | Fine | 25-30 seconds |
| Cold Brew | Coarse | 12-24 hours |
French press requires coarse grind to prevent sediment from passing through the mesh filter. The large particles allow proper extraction during the 4-minute steeping time without over-extracting bitter compounds.
Pour over and drip coffee makers use medium grind for balanced extraction. This size allows water to flow through the grounds at an optimal rate, extracting flavors evenly without channeling or clogging.
AeroPress and espresso machines need fine grind to create resistance for pressure-based extraction. The compact particles ensure water contacts sufficient surface area during the brief brewing time.
Cold brew uses coarse grind despite its long steeping time. The cold water extracts flavors slowly, and coarse grounds prevent over-extraction during the 12-24 hour process.
Mastering Essential Brewing Variables
Three core variables determine whether your coffee tastes balanced or falls flat: water temperature affects extraction speed, ratios control strength, and brew time influences which flavors end up in your cup.
Water Temperature and Quality
Water temperature directly impacts how quickly and completely flavors extract from your coffee grounds. The ideal range sits between 195°F and 205°F (90°C to 96°C). Water below this range leads to under-extraction, producing sour, weak coffee that tastes thin and acidic. Water above this range causes over-extraction, resulting in bitter, harsh flavors that overpower the coffee’s natural characteristics.
Most electric kettles with temperature control make this easy. If you don’t have one, bring water to a boil and let it rest for 30 seconds before brewing.
Filtered water matters just as much as temperature. Tap water containing chlorine, heavy minerals, or other impurities introduces off-flavors that compete with your coffee’s natural taste. Use a simple carbon filter pitcher or install a basic faucet filter to remove these contaminants. The difference in clarity and cleanliness is immediately noticeable.
Coffee-to-Water Ratios
The coffee-to-water ratio determines your brew’s strength and balance. A standard starting point is 1:16 (one gram of coffee to 16 grams of water), which produces a medium-strength cup that works well for most brewing methods.
Common Ratio Adjustments:
- 1:15 – Stronger, more concentrated
- 1:16 – Balanced, medium strength
- 1:17 – Lighter, more delicate
You need a digital scale for consistent results. Measuring by volume (tablespoons) varies too much based on grind size and bean density. For example, 20 grams of coffee with 320 grams of water gives you a reliable 1:16 ratio. Adjust from there based on taste.
Brewing Time and Extraction
Brew time controls which compounds extract from your coffee grounds. Different methods require different durations because of how water contacts the grounds.
Method-Specific Brew Times:
- French Press: 4 minutes
- Pour-over: 2.5-3.5 minutes
- Aeropress: 1-2 minutes
- Drip coffee maker: 5-6 minutes
- Cold brew: 12-24 hours
Under-extraction happens when water doesn’t spend enough time with the grounds. Your coffee tastes sour, salty, or grassy. Over-extraction occurs when brewing takes too long, pulling bitter compounds and astringent flavors into your cup.
Match your grind size to your brew time. Longer methods need coarser grinds to prevent over-extraction, while faster methods require finer grinds for adequate extraction.
Beginner-Friendly Coffee Brewing Methods
Three methods stand out for newcomers: automated drip coffee makers that handle the process for you, French press brewing that delivers rich flavor through simple immersion, and pour-over techniques that offer precision without complexity.
Drip Coffee Maker
Drip coffee makers automate the entire brewing process, making them the most accessible entry point for beginners. These machines heat water to the optimal temperature and distribute it evenly over coffee grounds held in a paper filter or reusable mesh basket.
You’ll get consistent results by using a 1:16 coffee-to-water ratio—approximately one tablespoon of ground coffee per six ounces of water. Grind your beans to a medium consistency, similar to the texture of sand. The machine does the rest, dripping brewed coffee into a carafe below.
Key advantages for beginners:
- No manual pouring or timing required
- Keeps coffee hot after brewing
- Easy to make multiple cups at once
- Minimal cleanup involved
Clean your drip coffee maker regularly to prevent buildup of mineral deposits and old coffee oils. Descale the machine every three months using equal parts water and white vinegar, running a full brew cycle followed by two cycles of plain water.
French Press Brewing
The French press uses immersion brewing, where coffee grounds steep directly in hot water before separation by a mesh plunger. This method produces full-bodied coffee with more oils and sediment than filtered methods.
Add coarsely ground coffee to your press pot—roughly one tablespoon per four ounces of water. Heat water to 200°F, just below boiling. Pour the water over the grounds, stir once to saturate everything, and place the lid on without plunging.
Wait four minutes for proper extraction. Press the mesh plunger down slowly and steadily, taking about 20-30 seconds for the full descent. Pour your French press coffee immediately to avoid over-extraction, which creates bitterness.
Brewing mistakes to avoid:
- Using fine grounds that slip through the mesh
- Letting coffee sit after plunging
- Pressing too quickly and agitating grounds
- Water temperature above 205°F
Pour-Over Techniques
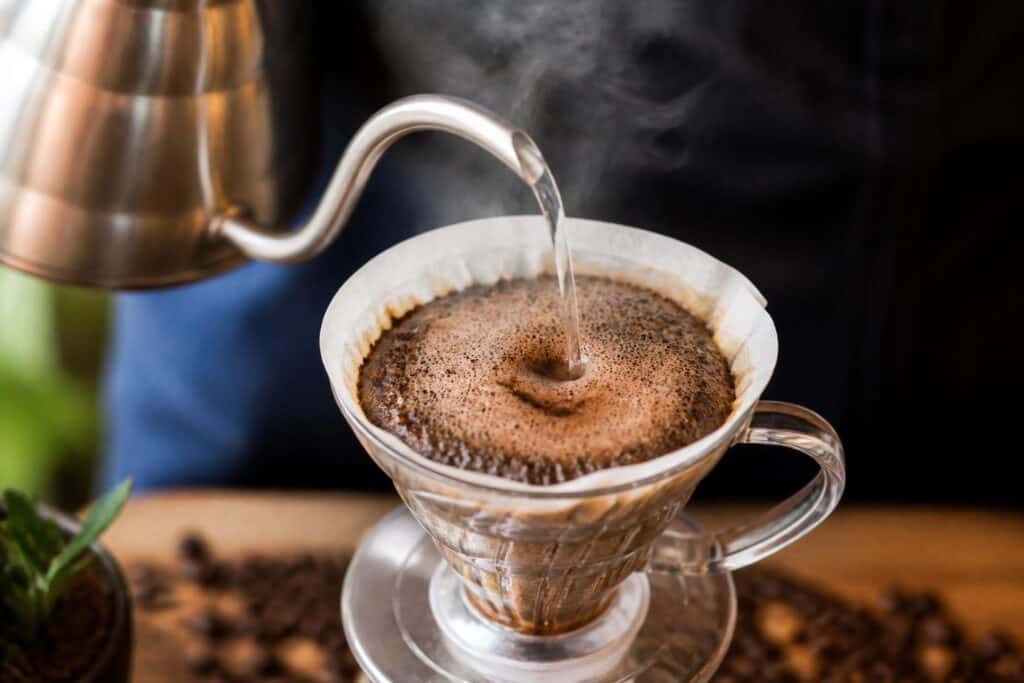
Pour-over brewing gives you precise control over extraction while remaining straightforward for beginners. Popular devices include the Hario V60, Chemex, and Kalita Wave, each using gravity to pull water through coffee grounds in a paper filter.
Place your paper filter in the dripper and rinse with hot water to remove papery taste and preheat the vessel. Add medium-fine grounds using a 1:15 ratio—15 grams of coffee to 250 grams of water works well for a single cup.
Start with the bloom: pour just enough 200°F water to saturate the grounds (about twice their weight) and wait 30 seconds. This releases carbon dioxide trapped in fresh beans. Continue pouring in slow, circular motions from the center outward, maintaining a steady water level.
The entire pour-over coffee process takes three to four minutes. Your brew time indicates grind size accuracy—faster draining means too coarse, while slower suggests too fine. A coffee filter produces clean, nuanced flavors that highlight your beans’ natural characteristics.
Popular Manual Brewing Devices
Manual brewing devices give you direct control over water temperature, pouring technique, and extraction time. Each device produces distinct flavor profiles based on its design and filtering method.
Using a Chemex
The Chemex uses thick bonded filters that produce exceptionally clean coffee with bright, tea-like clarity. You’ll need coarsely ground coffee, hot water around 200°F, and the proprietary Chemex filters.
Place the filter in the upper chamber with the triple-fold section facing the spout. Rinse the filter with hot water to remove paper taste and preheat the glass. Add 1 tablespoon of coffee per 5-6 ounces of water.
Pour just enough water to saturate the grounds and let them bloom for 30-45 seconds. This releases trapped carbon dioxide for better extraction. Continue pouring in slow, circular motions, keeping the water level consistent.
The entire brew should take 3.5-4.5 minutes. The thick filters slow down the flow rate compared to other pour-over devices. Remove the filter immediately after brewing to prevent over-extraction from residual dripping.
Hario V60 Guide
The V60’s cone shape and spiral ribs create optimal water flow through the coffee bed. Its single large hole at the bottom allows faster drainage than most drippers. You’ll need medium-fine ground coffee and V60 paper filters.
Rinse your filter and add coffee using a 1:16 coffee-to-water ratio. Start your timer and pour twice the weight of your coffee grounds in water for the bloom phase. Wait 30 seconds while the grounds expand and release gases.
Pour the remaining water in slow, steady circles from the center outward. Maintain a consistent water level about halfway up the dripper. Your total brew time should be 2.5-3.5 minutes.
The V60 rewards precise pouring technique. Small adjustments to grind size, water temperature, or pour speed significantly impact your final cup. Practice different pouring patterns to find what works best for your beans.
AeroPress Brewing Basics
The AeroPress uses air pressure to push water through coffee grounds, creating a smooth, concentrated brew in under 2 minutes. This device offers remarkable versatility through different brewing positions and recipes.
Insert a rinsed paper filter into the cap and attach it to the chamber. Add 2 tablespoons of medium-fine coffee to the chamber. Pour water heated to 175-185°F over the grounds and stir for 10 seconds.
Attach the plunger and press down steadily for 20-30 seconds. You should feel moderate resistance. The inverted method, where you flip the AeroPress upside down during brewing, allows longer steep times and prevents dripping.
You can dilute the concentrated output with hot water for a traditional cup or drink it as-is for espresso-style intensity. The AeroPress’s compact size and durability make it ideal for travel or camping.
Exploring Additional Methods for Beginners
Cold brew delivers smooth, low-acid coffee through extended steeping, while moka pots create strong, espresso-style coffee on the stovetop. Espresso machines produce concentrated shots under pressure for those ready to invest in more advanced equipment.
Making Cold Brew at Home
Cold brew requires no special equipment beyond a container and a way to filter coffee grounds. You steep coarsely ground coffee in cold or room temperature water for 12 to 24 hours, then strain out the grounds to create a concentrated brew.
The standard ratio is 1 cup of coffee grounds to 4 cups of water, though you can adjust based on preference. The long steeping time extracts different compounds than hot brewing methods, resulting in a naturally sweeter flavor with 60-70% less acidity.
Benefits of Cold Brew:
- Lower acidity than hot-brewed coffee
- Concentrated base that lasts up to two weeks refrigerated
- Serve over ice or dilute with water or milk
Cold brew differs from iced coffee, which is hot coffee poured over ice. The cold extraction process creates a distinct flavor profile that many find smoother and less bitter. You can use a French press, mason jar, or dedicated cold brew maker for brewing.
Introduction to Moka Pot
The moka pot brews coffee on your stovetop by passing boiling water through coffee grounds using steam pressure. This Italian device consists of three chambers: a bottom reservoir for water, a middle filter basket for grounds, and a top chamber that collects brewed coffee.
Fill the bottom chamber with water to just below the safety valve. Add medium-fine coffee grounds to the filter basket without tamping them down. Assemble the pot and place it on medium heat.
The water heats and creates pressure that forces it up through the coffee grounds into the top chamber. You’ll hear a gurgling sound when brewing is complete, typically after 5 minutes. Remove from heat immediately to prevent a burnt taste.
A moka pot produces strong, concentrated coffee similar to espresso but not true espresso since it reaches only 1-2 bars of pressure versus the 9 bars required for espresso. The result works well for straight drinking or milk-based drinks.
Basics of Espresso Machines
Espresso machines force hot water through finely ground coffee at high pressure (9 bars) to create concentrated 1-ounce shots in 25-30 seconds. These machines require a significant investment and learning curve compared to other beginner methods.
Types of Espresso Machines:
- Manual lever machines: Full control but steep learning curve
- Semi-automatic: You control shot timing; most popular for home use
- Automatic: Pre-programmed shot volumes
- Super-automatic: Grinds, tamps, and brews at button press
Entry-level espresso machines start around $200-300, though quality improves substantially at higher price points. You’ll also need a burr grinder capable of fine, consistent grinds since pre-ground coffee doesn’t work well for espresso.
Successful espresso requires precise variables: grind size, dose (typically 18-20 grams for a double shot), water temperature (195-205°F), and tamping pressure. Each adjustment affects extraction time and flavor. Many beginners find the process challenging initially but rewarding once they master the fundamentals.
Tips for Improving Your Coffee Journey
Avoiding common pitfalls and learning to adjust variables like grind size and water temperature will accelerate your progress in home brewing. Understanding these fundamentals allows you to craft specialty coffee that matches your personal preferences.
Common Beginner Mistakes
Using stale coffee beans ranks among the most frequent errors when you brew coffee at home. Coffee begins losing flavor within weeks of roasting, so purchase smaller quantities and use them within two to three weeks for optimal taste.
Incorrect grind size causes either over-extraction or under-extraction. French press requires coarse grounds, pour-over needs medium grounds, and espresso demands fine grounds. Inconsistent grinding creates uneven extraction, which produces bitter or sour coffee taste.
Water temperature mistakes include using boiling water directly from the kettle. The ideal brewing temperature ranges from 195°F to 205°F (90°C to 96°C). Water that’s too hot extracts bitter compounds, while cooler water leaves coffee weak and underdeveloped.
Neglecting equipment cleaning allows old coffee oils to accumulate and turn rancid. These residues affect coffee flavor negatively. Clean your brewing equipment after each use with hot water and mild soap.
Customizing Coffee Taste at Home
Adjusting your coffee-to-water ratio provides the simplest way to control strength and coffee flavor. Start with a 1:16 ratio (1 gram of coffee to 16 grams of water) and adjust based on your preferences. More coffee creates stronger brews, while less produces milder cups.
Experiment with different roast levels to discover what suits your palate. Light roasts highlight origin characteristics and acidity, medium roasts balance sweetness and body, and dark roasts emphasize bold, roasted flavors.
Water quality directly impacts your final cup since coffee is 98% water. Use filtered water to remove chlorine and impurities that mask delicate coffee notes. Avoid distilled water, which lacks minerals needed for proper extraction.
Brewing time adjustments let you fine-tune extraction:
- French press: 4 minutes for standard strength, 5-6 minutes for bolder flavor
- Pour-over: 2.5-3.5 minutes total brew time
- Cold brew: 12-16 hours for balanced taste, 18-24 hours for concentrate
Next Steps in Home Brewing
Investing in a burr grinder transforms your coffee journey by providing consistent particle sizes. Blade grinders create uneven grounds that extract poorly, while burr grinders crush beans uniformly between two surfaces.
A digital scale improves repeatability when you brew coffee at home. Measuring by weight rather than volume ensures accuracy since coffee beans vary in density. Track your recipes in a notebook to replicate successful brews.
Exploring specialty coffee from different regions expands your understanding of flavor profiles. Ethiopian coffees often feature floral and fruity notes, Colombian beans offer balanced sweetness, and Sumatran varieties provide earthy, full-bodied characteristics.
Consider trying manual espresso makers or AeroPress after mastering basic methods. These tools offer more control over extraction variables and introduce you to pressure-based brewing. Temperature-controlled kettles with gooseneck spouts enhance pour-over precision through steady, controlled water flow.